
What is Gmail?
However, occasionally I still get feedback wanting to know how to create a free Gmail email address. So here goes...
Please note: At the time of writing, Gmail is still in beta, i.e. still underdevelopment, which goes a long way in proving how successful the free email service from Google has been. Web users prefer a beta service over more established and "developed" services like Windows Live Hotmail and Yahoo!Mail.
Step 1 -Open the Gmail web site
To create your Gmail account you only need a web browser - the program you are using to read this page - and an internet connection.
You should now get to a page that looks something like the one below. At the time of writing Gmail offers a little over 7Gb of inbox space - though not unlimited but still more than enough to keep any prolific emailer occupied for years.
Click on the Sign up for Gmail link that I have circled in the screenshot and then proceed to the next page to get your free Gmail email address.
Step 2 - Enter all the required information in the "Create an Account" online form
After you click on the signup link, you shall be shown the Create an Account form with several fields that need your inputs.
Do not worry if the screen displayed to you and the screenshot image on the left are not exactly the same.
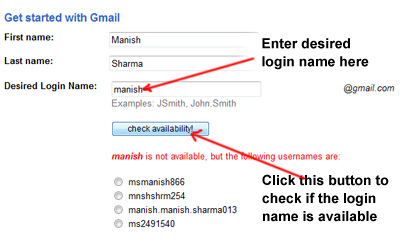
You now need to start filling the form. Once you have entered your first and last names, it is time to choose a login name. This is important as your login name will decide the email address you will get, and in case of a Gmail account, would be your-chosen-login-name@gmail.com. So be sure to pick a login name, also called the username, with care.
Step 3 - How to choose a login name or username for your email address
Choosing a login name is part art and part common sense. And because it determines what your email address will be, I suggest you spend a little time over it. Since, email addresses need to be unique which means no two people in the world can have the same address, there is no guarantee that your preferred login name would be available - more on this below. The following is my advice and suggestions on how to choose a login or username.
First check if you can get a login name of your name, firstname, lastname, as firstname-lastname or the more popular, firstname.lastname (yes, the period sign can be used in a login name). You can also try out firstnamelastname. Getting a Gmail email address of your name is indeed very fortunate because of the sheer number of subscribers to the service. However, if you have a relatively uncommon name, you do stand a good chance; I don't even try this because mine is such a common name - both my first name and lastname.
If your name doesn't work out, seek to couple your name with your profession - such as john.webdeveloper.
Your login name needs to be catchy and at the same time describe you so people are able to recall it without much difficulty and associate it with you. For instance, if you are a docile accountant from a small town, choosing "hells-angels" as the login name would be unwise. Rather, boone-accountant@gmail.com would be a lot better - FYI, Boone is a small town in North Carolina where I spend a day - lovely place.
I also advice against using numbers and digits in your login name unless, of course, they are a part of your company/business name. Again, you need to have a username that is easy to recall - you don't want people racking their brains and calling you up each time they forget your email address.
The availability of a login or user name can be verified by entering it first in the text field and hitting the check availability button.
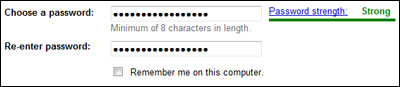
Step 4 - Choosing a password for your email
Securing your Gmail email account with a strong> password is imperative. Think of the password as the key combination to your safe and you need to give the same amount of importance. A combination of uppercase and lowercase letters with some digits thrown in would be a strong enough password. on the right of the textfields in which you enter your password a sort of meter would indicate the strength of the password.
You need to enter the password twice and you can leave the "Remember me on this computer" box unchecked.
Step 5 - Protecting your Gmail account with a security question
You now need to either select a security question from the drop down list or enter one - and you need to provide the answer. This additional security helps in getting your email account password if you forget it.
You may also enter a secondary email address but this field is optional, i.e. you can leave it blank. And rightly so, because if the Gmail address is your first email account you will not have an alternate email ID.
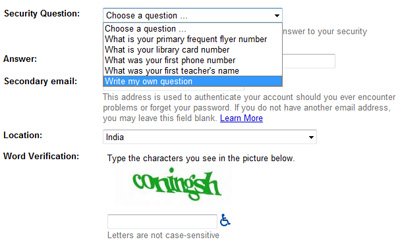
Step 6 - Word verification and confirmation
After providing your secondary email address - you can leave this blank, if you don't have one - and your location, you need to enter the characters that you see in the picture above the field in your form. Why is this required? So that Gmail knows the inputs are from a human being and not some automated program.
Now that everything is set, you can go through the Terms of Service and click on the "I accept. Create my account." button which will create your very own free Gmail account! Hurrah and congratulations.
To access your Gmail account in future, you need to go to the web site (links mentioned above) using a web browser and enter your username (login name) and password once again.
(___Hope that this post is Helpful for you___) (_Bhaig@jha_)
Post a Comment Blogger Facebook